HTC Vive 200/201 is also a most common error in HTC Vive. It means Vive HMD(Head-mounted device) not found, connected, or detected to the PC.
It may happen because of a loose cable connection, outdated drivers, missing plugins or drivers required by the VR system, etc.
We'll see all the potential reasons that are causing this issue and solutions that can fix those issues in this Guide.
What is a 200/201 Error code in HTC Vive?
According to the HTC Vive's Official support portal, this error is related to the USB Connection of a Vive console with a Windows PC.
Something in between Console and PC is creating a barrier to the connection. It may be faulty USB cables, cables not correctly plugged, or Driver related issues.
The headset cannot be detected. Make sure that cables are properly connected and then restart the headset.
How do you fix VIVE Error 200/201?
The main reason for Vive error 200 or 201 is that the VR headset device is not connected to the PC Vive Software.
See, there is not only one reason that could be causing this issue. We need to try all possible solutions to overcome the problem.
Following are some tested and working methods that you can try!
Method 1: Check USB, HDMI & DisplayPort Connections
Check the USB Connections are plugged in correctly within the setup of the Headset, Controller, Base station, link box, and PC.
Check that you're using the USB 2.0, HDMI 1.4 & DisplayPort 1.2 or Above. If you've more than 1 of those ports, try switching between them.
Also, try to connect the USB & other connector Cables. Because, for a long time you've kept the cable connections as is, and connector points/plugs accumulate some dust particles.
In some cases, that blocks the electricity flow between the VR Setup. So, it's good practice to replug the devices.
Method 2: Reinstall the HTC Vive Console desktop app
If you've tried the above method and it didn't work for you, then you should consider other methods like repairing, Updating software, and graphics drivers.
First, we'll try to reinstall the HTC Vive console app. Visit the Vive Console app download page and Install the software.
Method 3: Reinstall or repair the Graphics and USB drivers
You can also update the Graphics & USB Drivers which are being used by the HTC Vive console app for smooth working of its setup.
You've to update that through the Windows(⊞) > Windows device manager > Choose Universal Serial Bus connector/Human Interface Device/Display adapters
Try to update all of them or you are unaware of which device to update. You can try to update them through the HTC Vive console app.
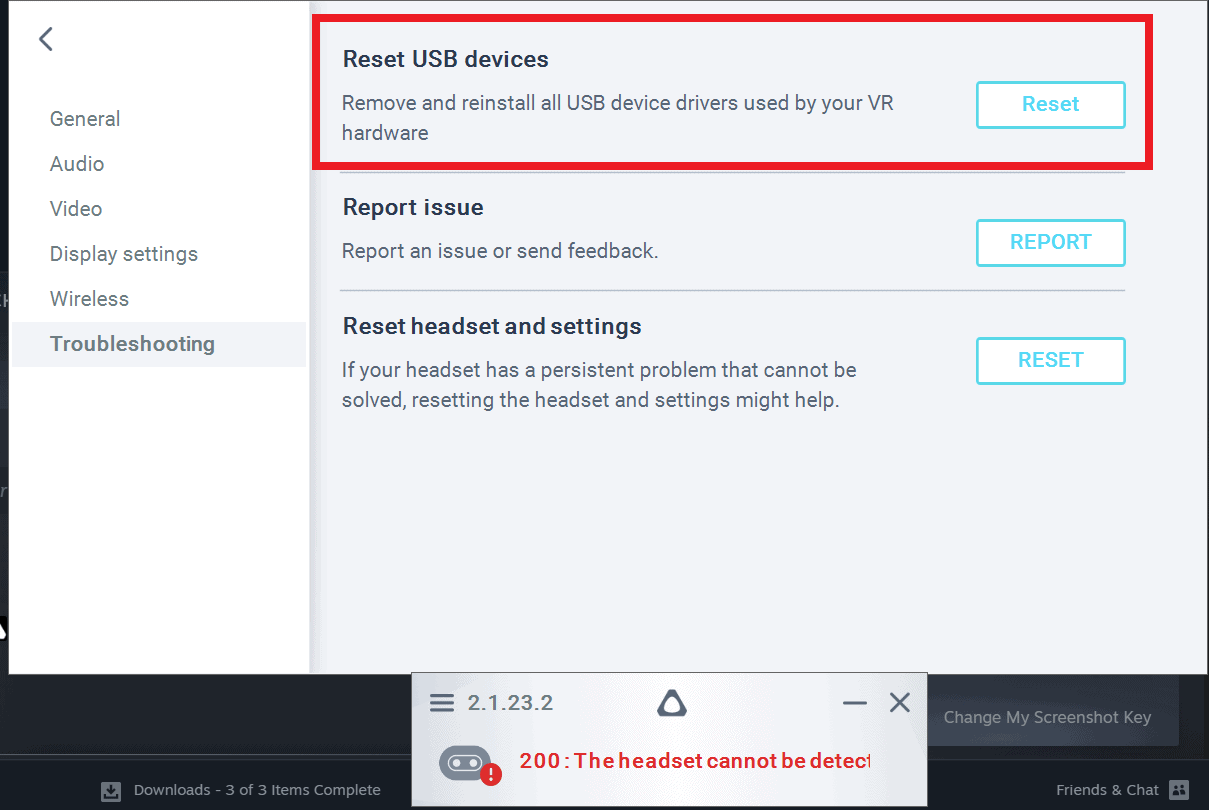
1. Open the Vive Console app
2. Navigate to the path - Settings(Hamburger menu) > Troubleshooting > Reset USB devices
3. Press the Reset button
It will reset all the Physical connections and remove drivers that may be creating the cause. You don't need to go to Device Manager and manually update them.
Remove all the plugs and connection cables for a few minutes. Now just replug all the cables and it will start installing the drivers by itself.
Method 4: Install or update to the Latest Media feature package
If you've tried updating the Vive console and drivers, it hasn't helped you. Then you should try to get the Windows Media feature pack installed or updated if it's already installed in your machine.
Visit Microsoft's official website to download the Windows Media feature pack & install it
Otherwise, you can install a new update or wait for a newer Windows build which will contain the newer version of the Media feature pack.
Mostly this solution will fix your issue. Give it a try and still you're still not able to launch the HTC Vive, then refer next solution.
Method 5: Downgrade the PC Graphics & Vive Device Drivers
NVIDIA GeForce GTX, AMD Radeon, Intel UHD, or Iris Xe whatever Graphics you have. Get its driver files from Google, a few versions older than current/latest.
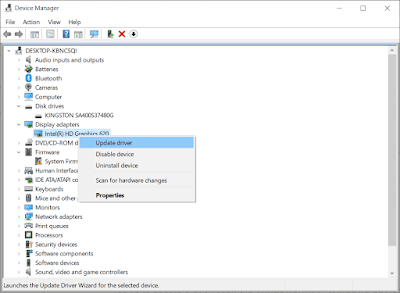
1. Open the Device Manager and then open the specific device
2. Now, right-click on the device and choose Update Driver option
3. It will show two options - Search Automatically for drivers and browse my computer for drivers
4. Go for the second choice and attach the driver file
It will automatically install the driver that you've provided and you can try to launch the Vive setup.
It should work now. If still the VR device is not detected, then we've one more alternative method.
Method 6: Downgrade the Windows build to previous versions
If downgrading drivers isn't working, then you can try to downgrade the Windows build.
You'll easily get previous versions of Windows ISO from Microsoft's official website.
Take that one and make the Bootable USB. Install that build.
You can also roll out to the previous version using the Windows Recovery Software or System Restore point(If you've saved the Restore points).
Don't forget to back up your important files before performing anything.
Method 7: Wait for an Update from HTC
We have tried almost everything that we were able to possibly do. Maybe there is a Compatibility issue with the HTC console app and Graphics drivers.
In the end, the only thing you can do is Share the feedback with HTC and wait for the HTC Vive console's new update.
That update may bring patch fixes for this issue that you shared over Feedback.
Also, you can connect with the Vive support team regarding this issue.
FAQs:
How do I resolve the "HTC Vive Cosmos USB not detected!" issue?
The above guide applies to almost every Vive Device that is causing a USB or Headset not detected issue.
So, if you want to get rid of the issue, you've to try the above steps like Updating the USB Driver, Console app, etc.
We'll recommend that try each and every method and it will probably fix your issue.
How to fix 'HTC vive is not detected'?
There are two types of HTC Vive headsets that are not getting detected - USB or Wireless.
This guide focuses on the USB-related issues that are causing the HTC Vive headset to not get detected by the SteamVR.
For Wireless Vive devices, we've written a separate guide for that. You can check it here.


0 Comments
Post a Comment