With a wireless adaptor you can convert your existing HTC Vive wired headset into a wireless headset.
The crux of the matter seems to be connectivity where the Vive headset's presence is not being acknowledged by the Wireless Adapter, accompanying software, or your PC's Operating system.
Sometimes, due to many reasons, wireless adaptors don't work as expected. If you are facing similar issues, this guide may help you!
Probable Reasons for HTC Vive Wireless Headset Not Getting Detected!
Why is the HTC Vive VR headset not being detected? There could be many reasons for the Wireless Adaptor not working properly with the Headset.
I. Incompatibility with your Motherboard processor - The HTC Vive Wireless adaptor is not compatible with some AMD Ryzen chipsets.
II. Vive Wireless headset USB conflicts - There are some conflicts in the Wireless headset USB port which we used to connect the Vive Wireless adaptor.
III. Sensor unit not working - This is one of the reasons that is blocking your PC from getting fetched & detected by the HTC Vive wireless headset.
IV. Issues with PC Operating system - There is the possibility that your PC OS is creating conflicts with the Wireless adaptor and Vive-related software.
V. Issues with Headset apps - There might be some issues that came up with Vive and SteamVR apps after the new patch update.
VI. Damaged parts & cables - Sometimes, damaged and aged cables & parts of your Vive VR device can create barriers in connectivity for the Wireless adaptor.
7 Solutions to Fix the HTC Vive wireless Headset is not detected issue!
We've seen the probable root causes that are creating the disturbance in establishing the wireless connection.
We'll try to implement solutions one by one for each of the causes.
Solution 1: Confirm the chipset in your Motherboard
Check whether you're using Ryzen chipsets. If your CPU is powered by AMD Ryzen processors, then you've to worry about Wireless adaptor compatibility.
So, either use the adaptor on a different computer, change the processor, or return the wireless adaptor.
You'll need to connect with the HTC Vive support team, to know about the refund policy. Share the bill and your CPU Processor's model number and other details.
You can return the Wireless adaptor and they will refund your complete payment. Refer to this blog for more details.
Solution 2: Change the HTC Vive Wireless headset USB port
As we mentioned earlier, there could be an issue with the Wireless headset USB port.
Just try to switch between different USB ports of the Wireless headset unit.
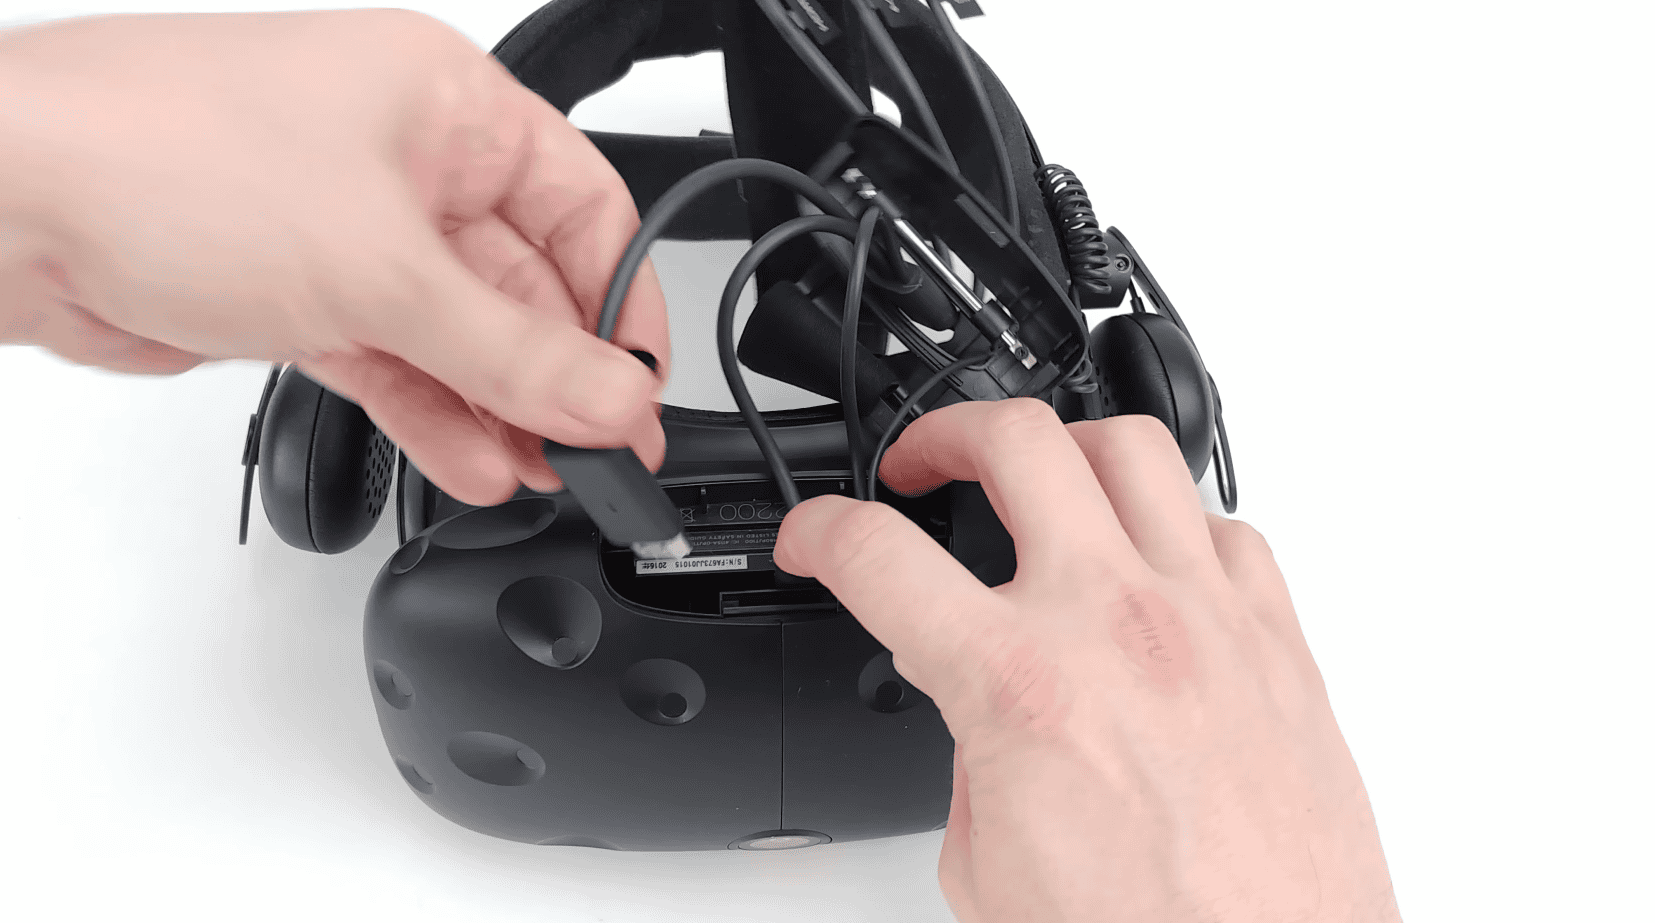
1. Open the lid of the cables from the top of the Headset. You'll find a Power, an Audio speaker, HDMI & 2 USB Ports
2. Plug out the USB from one port and plug it into another one as shown in the below picture
Just restart everything and you'll see a green light in your Vive wireless headset. Your device will get connected to the PC wirelessly without any issues.
This solution looks very general but eliminates most of the connectivity issues in HTC Vive Wireless headsets.
Solution 3: Reset the PCI Express WiGig card Configurations
If the previous method is not working for you, then you can try this. Because the reason in your case could be different.
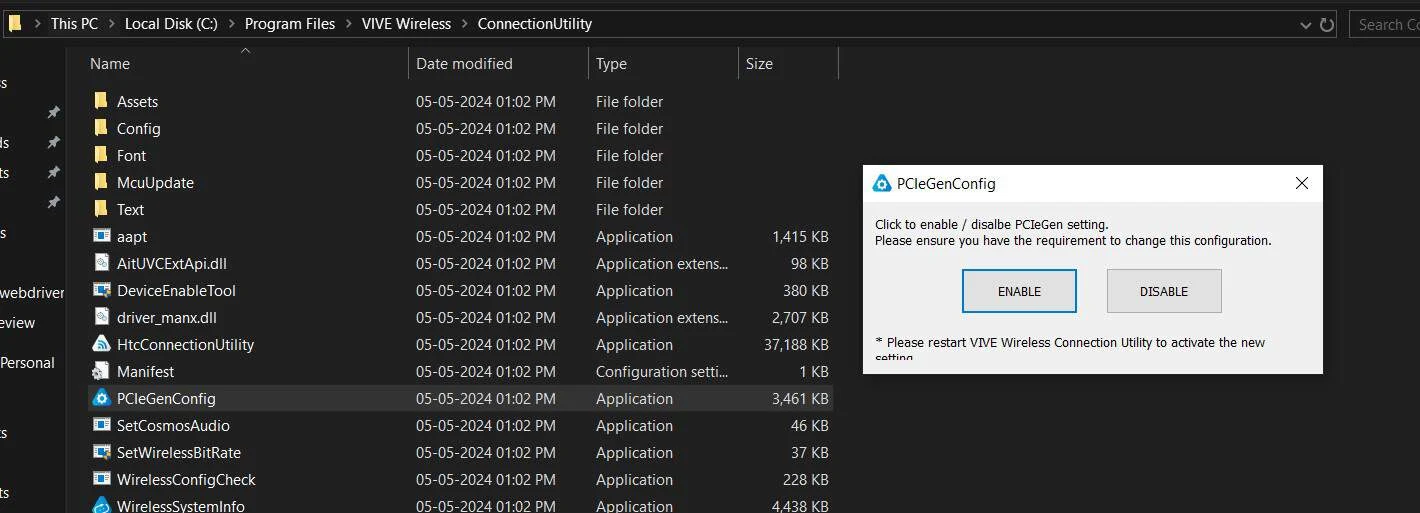
1. Search the "PCIeGenConfig.exe" in File Explorer and locate the file(Mostly you'll find it under the Vive wireless folder in your Primary Disk)
2. The path of the file in my PC is - C:\Program Files\VIVE Wireless\ConnectionUtility
3. Run the PCIeGenConfig.exe utility
4. It will open a prompt window that will have the PCIeGen option
5. Toggle the Enable PCIeGen setting option
Running this file will reset the faulty PCIe WiGig card configuration and it results in resolving the compatibility issues between certain motherboards and the Wireless Adapter in most of the cases.
Solution 4: Reinstall the Vive from your PC
You can try to reinstall the Vive again with Admin permission. Because when Vive gets updated, developers often make some changes in permissions.
It results in connectivity or the vive app's functionality.
1. Close the Steam completely from Show hidden icons
2. Go to Windows Settings > Apps
3. Search for Vive and uninstall it
4. Now, Open the Steam with ADMINISTRATOR and install the Vive Wireless setup .exe file again
The connectivity issue between the Wireless adaptor and SteamVR will be resolved.
Solution 5: Reinstall a fresh Windows copy
If you've tried everything from the above solutions, then you can try this fix.
Vive Console, Steam, and Steam VR on C Drive. Backup the files(Vive-related files and others).
Clean installation of Windows will mostly probably resolve deep-rooted software conflicts, driver incompatibilities, or system corruptions that may impede Vive's seamless operation.
Solution 6: Replace damaged Hardware
Carefully check the Vive headset, Wireless Adapter, Wireless adaptor battery, WiGig card, and associated cables for any physical damage, fraying, or hardware defects that could have been a reason to impact connectivity between Vive wireless.
Replacing the stock USB 3.0 cable connecting the Wireless Adapter and battery pack with a higher-quality alternative has proven effective in mitigating dropouts, stuttering, and connectivity hiccups.
If you find anything damaged, seek a replacement from HTC support or get it from Amazon.
Solution 7: Check the Logs and error reports generated by Vive or SteamVR
Look for log files, system reports, and any error messages generated by Vive or SteamVR for clues or specific error codes that could shed light on the underlying issue and guide targeted troubleshooting efforts.
Generate the Vive wireless logs and keep them ready to share with the Vive Support team.
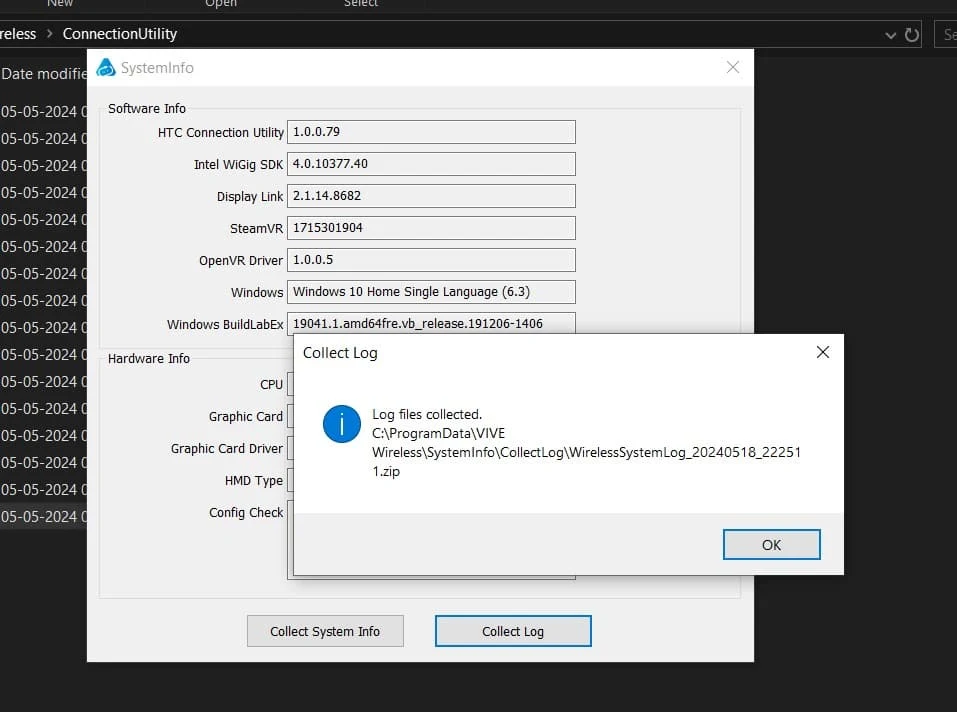
1. Follow this path - C:\Program Files\VIVE Wireless\ConnectionUtility
2. Open the app called WirelessSystemInfo
3. Click the Collect Log option
4. It will collect all software data like HTC Wireless, Intel WiGig SDK, Display Link, SteamVR, Windows OS & Hardware data like GPU, CPU info, Headset, WiGig card connection through PCIe, etc., and generate the log file
5. It will open the log folder after log generation
Try to resolve this at your end first. If it is still not resolved at your end, then you can connect with Vive support and share those logs & Error reports with them for further investigation.
VIVE Pro Wireless Headset Display not working!
It may be happening because either your Wireless adaptor is not properly connected to your PC or due to software issues.
You might try to reinstall DisplayLink XR, which may help to resolve the Wireless connection between the Vive wireless adaptor & PC SteamVR.
1. Navigate to C:\Program Files\VIVE Wireless\DisplayLink
2. Select a DisplayLinkXR application
3. It will start running the DisplayLink XR Setup Wizard
4. Choose the Repair option as it will reinstall all the application files and reset the registry entries
5. Hit next and complete the installation
Now, you can check whether the issue is resolved or not. If still the issue persists, you can refer to this guide on fixing the Vive Display-related issues.
Here we conclude...
All the provided solutions are tested and work at our end. But in most of the cases,
- Switching between Vive headset USB ports
- Resetting the PCIe Configurations
- Reinstalling a Fresh copy of Windows 10/11
- Replacing damaged Hardware like Battery, Adaptor, cable
will fix the issue. The fixes mentioned above are suggested and try to apply in a given order.
If you're still not able to resolve this issue by using any of the above solutions, you can drop your questions and concerns in the comment section.
Our team will investigate the issue and provide you best possible solution to get it resolved as soon as possible.


0 Comments
Post a Comment