A "Camera Communication failed!", "Camera not getting detected" by the headset and controller, Camera stopped working while VR is turned on and Camera not working for any reason are some of the most common issues when we perform Camera tests in VR devices like HTC Vive, Valve Index, Oculus Quest, etc., with SteamVR.
It means that our VR camera is failing to communicate & connect with the SteamVR on a PC.
This guide will work on Steam VR devices like Valve Index & all HTC Vive VR devices like Vive, Vive Pro, Vive Pro 2, Vive Pro Eye, Vive Cosmos, and Vive Cosmos Elite.
It is the Communication failures between the Camera and the Computer or VR system, which could be due to SteamVR Camera/Privacy settings, USB ports, Software drivers, Connectivity or bandwidth issues, etc.
Key takeaway:
- Main reason behind HTC Vive/Valve Index Camera not able to estalish connection with SteamVR is USB, 3rd party software/plugins/anti-virus program, App Permissions/Settings or Software bug in either SteamVR or Vive.
- So, focus on these thigs only try to all the give solutions. This error is not related to your Vive or Index.
So, to counter the problem we need to check the camera settings on both sides and other solutions too.
Reasons why the HTC Vive Camera is not working!
This could be due to a variety of reasons including settings, hardware, or driver issues that are causing the camera not to work as expected for the Vive Headset.
We'll have a look at some of those reasons:
1. Camera is disabled in SteamVR - Maybe the Camera option is disabled inside the SteamVR settings.
2. Camera driver needs to be rolled back or reinstalled - Try to uninstall the current version of Camera Driver and get the older version from the Web.
Place it inside anywhere in C drive and try to update the from Device Manager.
3. SteamVR is outdated - The SteamVR firmware may need an update. It's the most common reason that creates compatibility issues with Vive HMD & controllers.
4. Camera might be blocked by physical obstructions - Sometimes the reason could be physical only. There might be something stuck in the Camera lens or inside the VR HMD.
5. Buggy plugin or application - It might be you've installed a buggy plugin, and it was causing the issue.
6. Camera access is not provided properly - Windows, Ati-virus, or any third-party software/plugin is blocking the Camera from communicating with SteamVR for security reasons.
7. Issues with GPU, USB cables, connectivity & Ports - There might be a possibility that due to GPU, USB cables, connectivity & Ports, the camera is not working.
8. Camera may be physically damaged or faulty - As you try all the fixes. Nothing seems to work. Then this could be the reason for Camera not working.
7 ways to fix HTC Vive/Index Camera communication failed with SteamVR issue
We'll try to fix the camera issue with 13 different methods. Because there's not a single solution that will work for everyone.
Everyone faces the same issue for different reasons like USB connections, app settings, 3rd third-party software like NaLo, etc.
Fix 1: Plug out and reboot the SteamVR
The first thing you can do before getting started with any other solutions is just try to plug it out, Close SteamVR, keep it out for 10 seconds, plug it again, and restart the SteamVR.
It sounds simple and basic, but in most cases, it fixes the issue.
For a long time, we haven't even plugged out the cables and USBs of Vive consoles, controllers, Hub, or base station with PC CPU.
Fix 2: Use a USB 3.0/3.1/3.2 port and update USB Drivers
If the previous method isn't working in your case, then you can check USB port types. Check your USB Port whether it is a 2.0, try 3.0, 3.1, or 3.2(As per your availability).
In my case, my laptop has three ports - 2.0, 3.0, and 3.1. I Switched to 3.0(because it's connected to my Motherboard).
I use 2.0 for the mouse only. I plug PenDrive and other USB storage media into 3.0, 3.1, or 3.2.
That may fix the Camera connection issue because your Camera may not be connected properly or USB port 2.0 isn't capable enough anymore.
Sometimes outdated or corrupted USB drivers can cause Vive camera-related issues.
Along with changing the USB ports, you have to update your USB and device drivers.
To update the USB driver, you can follow the below steps
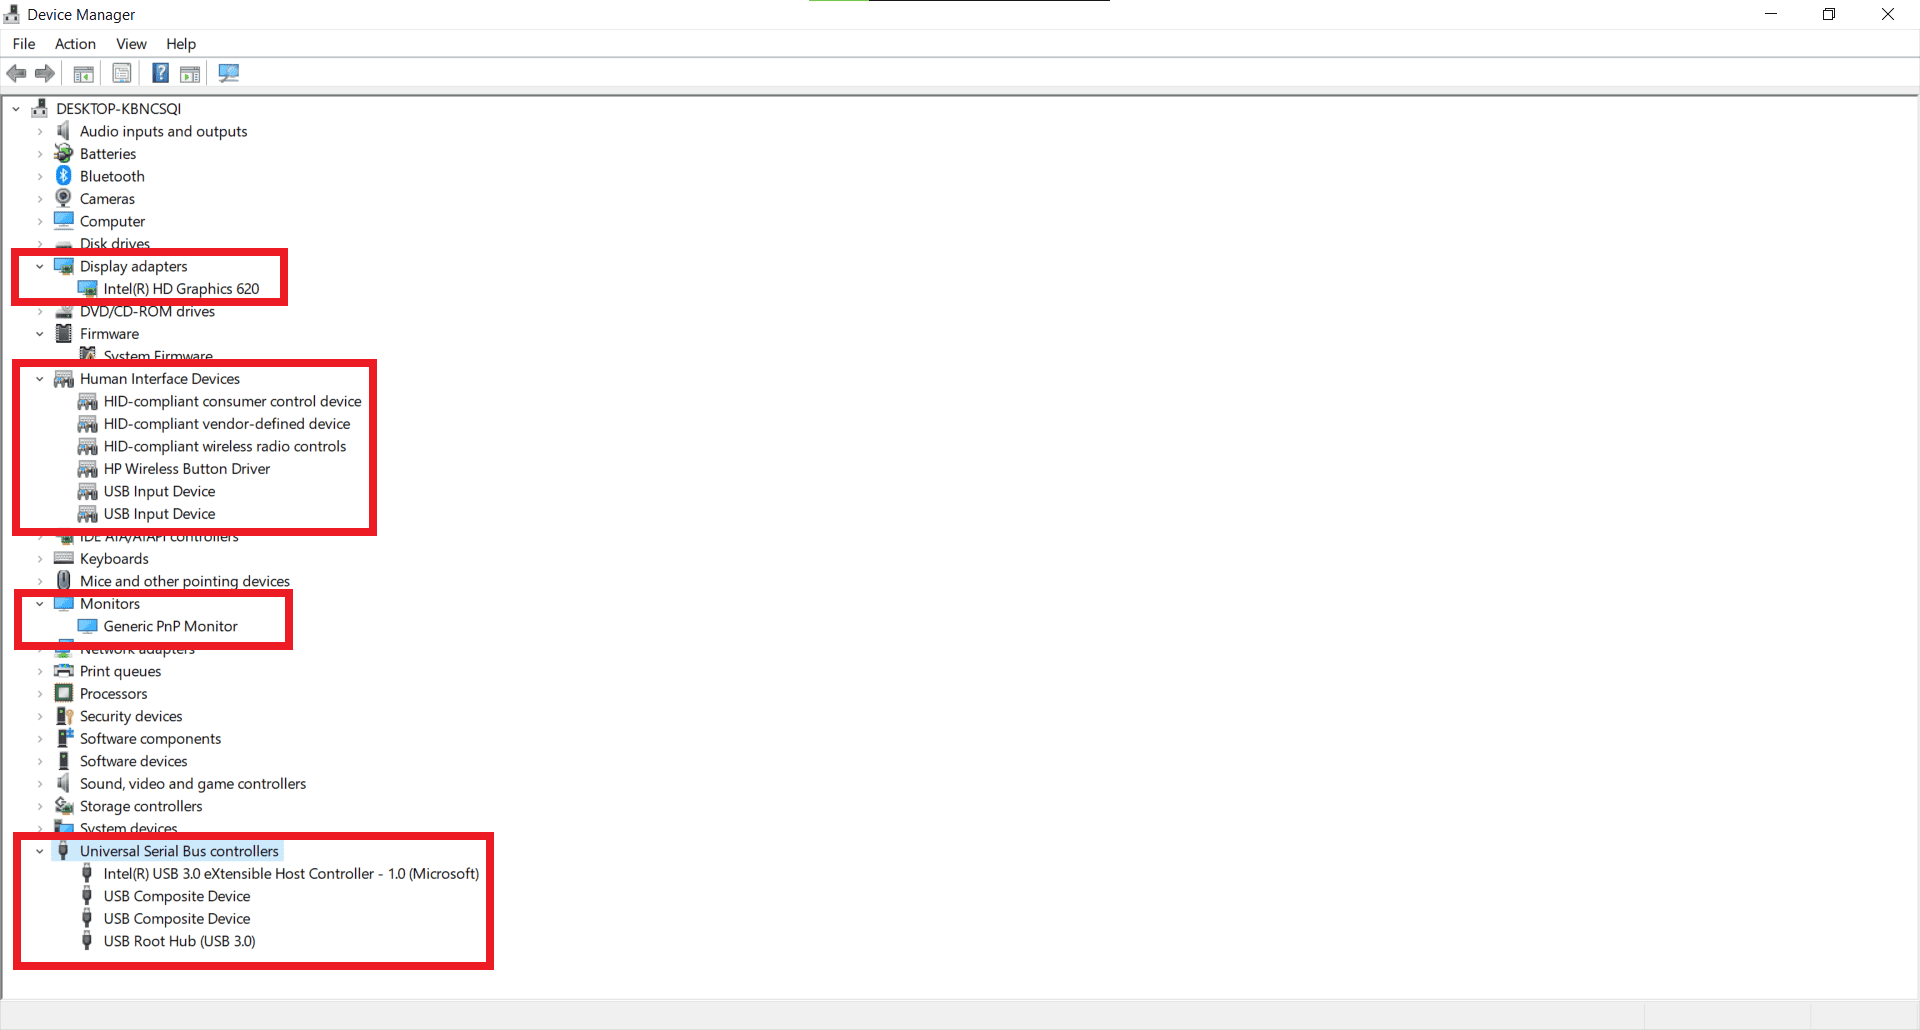
1. Press WINDOWS + R, then type devmgmt.msc then press CTRL + SHIFT + ENTER(it will run a program as administrator)
2. Then click on the Universal Serial Bus controllers, Right-click on the USB driver, and then on the Update driver.
Now, select Search automatically for drivers and it will search for the latest drivers.
You can also try to unplug other devices from your USB 3 Series ports and just keep plugged in the HTC Vive on those USB 3 Series ports.
Try changing the USB within USB Port 2.0, 3.0, or 3.1 which may help, because sometimes the problem is in Connectivity.
You can also try changing the cables that come with your VR Device. For e.g., you can use your Smartphone device's USB Type C Cables to check the compatibility.
For detailed troubleshooting of USB-related issues for HTC Vive devices, refer to this guide. This has helped some people because the culprit was USB.
- 5 Ways to Fix HTC Vive USB Not detected on Windows 10 & 11!
Fix 3: Uninstall 3rd party softwares
3rd party addon software/plugins like NaLo(Natural Locomotion) or an OpenVR Input Emulator are causing the issue for SteamVR with HTC Vive & Steam Valve Index cameras.
Most people face this Camera communication issue because of this reason. It is the Driver of the software that causes the Camera problems.
So, you can simply uninstall this software or just find a replacement for them.
While uninstalling NaLo, remove the Natural Locomotion folder from these locations - C:\Program Files (x86)\Steam\steamapps\common\Natural Locomotion.
For OpenVR, check the path <Drive>\Program Files\OpenVR-InputEmulator and run the Uninstall.exe
Also, remove the driver files from this location(if exist in this folder) - Steam\steamapps\common\SteamVR\drivers
Fix 4: Enable the Default Windows 10/11 Camera app
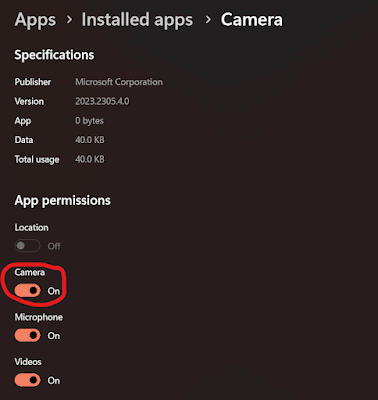
You can also check Navigate to Windows settings and follow the below path -Windows Settings > Apps > Installed Apps > Camera
Then, Enable the Camera permission for the Windows Camera app.
Allow the permissions for other apps that are using the Camera like Skype, Teams, Discord, etc.
You can also Enable or Disable it through the Privacy option.
Now, try to open SteamVR and see if the Camera is working or not? Most probably now you've fixed your Camera communication issue.
Fix 5: Whitelist SteamVR in your Anti-virus
Maybe your Anti-virus Software is blocking SteamVR from using the Vive Camera. You need to allow SteamVR to use the Camera.
I'm listing some major anti-virus programs & steps to allow the camera permission for SteamVR.
Windows Defender
1. Open settings and follow the path - Updates & Security > Widows Security > Firewall & network protection
2. now select Allow an app or feature through Windows Defender Firewall
3. Look for a SteamVR and allow it if it's not allowed
BitDefender
1. Follow this path - Protection > Settings(under firewall pane)
2. Navigate to the Rules tab and allow access for SteamVR(if it's blocked)
Now we need to allow the camera access which is locked y BitDefender Webcam Protection.
1. Select Privacy > Settings(Video & Audio Protection pane)
2. Choose the Settings option
3. Toggle the ON/OFF button and check accordingly
Norton
For Norton, visit the Norton app and open the settings. There you'll find the SafeCam option.
Head towards the Access tab & choose your app(SteamVR) to allow it.
After that, it will not block the Camera or any other access for SteamVR. It may help in fixing Camera-related issues.
Fix 6: Ensure the GPU Connectivity
Make sure that both the Headset and Monitor are connected to the same dedicated GPU graphic card.
Identify the ports on your graphics card (GPU). Common ports include HDMI, DisplayPort (DP), and DVI.
Note that some GPUs have multiple HDMI or DP ports.
Remove any USB hubs or display adapters. Avoid using the motherboard’s integrated GPU for the monitor connection.
It may create interference between the Headset and the Monitor.
Fix 7: Adjust the Camera Frequency
There is a possibility that your PC is not capable of handling the 60 fps framerate of your VR device camera.
So, you can change the framerate to 30 Hz from 60 Hz. It will lower the video refresh rate, but can potentially fix the 'Camera communication failed' error.
If the issue still persists, you can follow this article to troubleshoot the issue - Guide a HTC Vive camera not working!
FIX: HTC Vive camera not working on Discord!
First of all, check that Camera permission is given to the Discord application.
In order to fix the Vive camera issue on Discord, first try out the above solutions. If the issue persists, you can try it after restarting the HTC Vive device along with the Windows PC.
It will close all the other apps that are using the camera simultaneously with Discord & your Vive VR console.
Conclusion
We've suggested a few methods to fix the Camera Communication failing issue.
All the mentioned methods are working for almost all Valve Index & HTC Vive VR series like Vive, Vive Pro, Vive Cosmos series, etc.
The mentioned techniques are proven and working. Some are tested by us & some are claimed to be helpful by others.
If any of the solutions work for you, please drop your valuable feedback in the comment section. So, others will know which fix is correct for their case.
If none of the methods is working, then maybe the problem is with your Hardware.
Consider changing the Motherboard or you can change your existing PCI USB Port to a 3.0, 3.1, or 3.2 compatible PCI USB Card. That will fix your issue for sure!
Otherwise, we're suggesting you use the Windows 10 Camera app instead of the SteamVR PassThrough view.
FAQs:
What does the red light on the HTC Vive mean?
The red light on the HTC Vive headset typically indicates an error or a problem.
It's a signal to check the connections, such as the 3-in-1 cable on the link box, or to restart the link box by unplugging and replugging the power adapter.
Can you use HTC Vive without cameras?
Yes, you can use the HTC Vive without the cameras. The primary use of Vive cameras is room-scale tracking and see-through vision.
However, if you don’t need these features, you can still enjoy VR experiences without cameras.
The core functionality of the headset like Tracking and Gameplay remains unaffected even if the cameras are disabled or not connected.
Why is the camera there in the HTC Vive controller?
The camera acts as the vision when we are using the Vive. It captures the objects around it and integrates them with virtual reality objects.
It's used to create a Blurry Monochrome version of the real world inside the Virtual reality world.


0 Comments
Post a Comment